GroupCalendar™ for Outlook®
2000 / XP / 2003 / 2007.
Flexible
- Works without a server and
with a laptop on the road. Easy to install - Start the setup, adjust one setting and the
office has a shared calendar. Easy to use - No actions required to share. Needs only one click
for private or hidden appointments Effective - Create appointments for others directly in the Group Calendar
in Outlook.
Support - Fast & friendly helpdesk, response to email
questions in under one hour, direct connect phone hotline Fair - 3 years of free support and free updates, no annual
fees, no additional costs.
GroupCalendar™ for Outlook®
user manual
The default settings for database
and group calendar folder in Outlook are not being discussed in this manual.
They can be found in the installation manual.
Because there are three versions
with slightly different feature, this manual first discusses the common features
and after that the version specific differences.
Synchronization(Version SetupUK en
SetupUKDA) -
what is synchronization
- manual vs. automatic
- periodic checks in GCSystray
- fast mode
- refresh GroupCalendar
- export calendar
- select date range
- tips
All versions
Managing appointments
Personal
appointments
- Appointments in the personal calendar for everyone to see
- Private appointment with obscured details
- Creating fully hidden appointments
Acting
as a delegate
(Version SetupUKDA)
- Creating appointments for others
- Editing Appointments for others
- Deleting appointments of others (not)
- General appointments (announcements / group items)
- Tip to reduce clutter
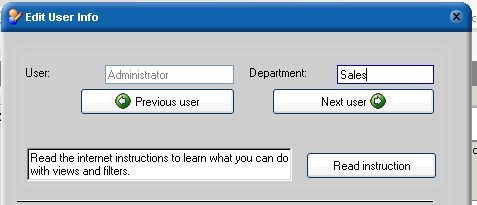
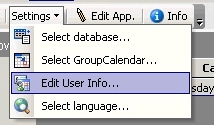
Try menu Settings -
Edit user Info .. , a number of user adjustable settings can be reached.
User names
The GroupCalendar
program determines usernames automatically. More info on what it does and how
to change them can be found in the Tech. background
section.
Department
By clicking the green
arrow keys for 'previous user' and 'next user', all known users are shown one by
one and the Department value can be altered in the corresponding field.
The department
value plays an important role in both the Grid view and for filtered views in
Outlook to selectively display groups of users. All users with the same
department value can easily be selected from the Grid view with one click in
the department selection list.
Nick Name
The field that
shows the value 'Joe' in the screen on the right is the field where a short
name can be specified to display the appointments with in the Group Calendar
folder or Grid View. The green arrow buttons are not used to specify this nick
name. This setting can only be altered by the logged on user.
When a (new) short name is entered, the new name will be used from that moment
on. To update existing appointments with the new short name, the 'export'
button must be pressed The export button can be found in the 'sync
groupcalendar' form.
Don't
participate
For assistants or
managers that want to see the contents of the Group Calendar but don't want
their personal calendar to join in the group it is possible to disable the
monitoring of the personal calendar by GroupCalendar™.
It will still be possible to create appointments in the Group Calendar folder
in Outlook® for
others (SetupUKDA)
Message boxes
When Outlook®
starts it displays a message that the personal calendar is being monitored.
Some people find this distracting and can choose to disable the message
although that is not the advised setting. The message is only visible for a
couple of seconds during the startup of Outlook®. Should the GroupCalendar™
add-in fail to load, there are two redundancy features built in to ensure that
the appointments in the personal calendar still reflect in the Group Calendar.
The first is GCHELPER.EXE that tests every 30 seconds if the add-in is still
operating as it should and fix it if it's not. The second feature is in
gcsystray, where it compares every hour if the database content corresponds to
the personal calendar content.
There is a message
disabling setting for the mutation or creation of appointments by delegates as
well. Normally a message comes up when delegates edit or create appointments
for other users.
The Grid View shows
the contents of the GroupCalendar™
database in real-time. As such it is independent of the synchronization settings
that keep the Group Calendar folder in Outlook®
up to date with the database. Apart from that it has some great filtering and
grouping options built-in that are hard to achieve in Outlook®
alone.
Grouping
by department
Using the Departments
selection list it is possible to filter the available database information and
show only appointments belonging to group members with the selected Department
value set in [Settings, Edit User Info].
Group by Type
When creating an
appointment in Outlook®
it defaults to the status
'Busy'. However one can change that value into Free, Tentative or Out of
Office.
This value can be
used to further filter the available information and show only appointments
that correspond to the value chosen on the left.
Date range
De buttons 1,5,7,31
show information about the corresponding number of days. The arrow keys ( < >
) shift the view on the chosen range up or down with a value lower than the chosen
range. In other words when a day is in view, it shifts one hour. When a week is
in view it shifts a day and when a month is in view it shifts a week.
Zoom etc.
The green sliders
work as a magnifier for the X or Y axis.
The today button jumps to the current date.
Normal day shows 24 hours while work day shows 10 hours.
The entire window
can be enlarged by hovering the mouse in the corner and grabbing/dragging
it. The available information can be printed as well.
Version SetupUKEx
can be recognized by the fact that is does not have a 'Sync. GroupCalendar'
button.
Version
SetupUK does have a 'Sync. GroupCalendar' button but it does not have a
'edit appointment' button.
Version SetupUKDA
has both a 'Sync. GroupCalendar' button as an 'edit appointment' button.
UKEx should be used
when the Group
Calendar folder is a shared Public folder on the Exchange server. (synchronization
not necessary)
UKDA can be used when one has to make appointments for other people or always
use only the Group Calendar folder in Outlook.
UK can be used when one does not have to act as a delegate and does not want to
do anything else then work in the personal calendar and look in the group
calendar.
The button to open the
synchronization options form.
What is it ?
Synchronization is the process that shows the user in Outlook® what other
users have in their personal calendars.
Synchronization
translates database records to appointments in the Outlook® group calendar
folder. It also creates appointments in the personal calendar of the user when
another user created that in the group calendar for that user.
Synchronization also
cleans out old appointments from the Outlook group calendar folder if those
appointments are no longer related to a database record because the owner of the
appointment removed it from their personal calendar or applied the 'hide string
@@@' to that appointment.
in other words:
- Synchronization shows what others have in their personal calendars.
- Synchronization creates appointments made by delegates
- Synchronization cleans out old appointments
Manual vs. automatic
synchronization
One can
start a synchronization at any time manually or leave it up to the auto sync.
tool that runs in the system tray next to the clock. The interval is
adjustable from 5 to 120 minutes.
To enable the auto
sync. tool, the checkbox 'Launch Auto-sync on Outlook start-up' must be
ticked. (the Start Autosync button will also start it but will not start it
automatically at Outlook® restart)
If auto sync is
active, the calendar icon will be displayed next to the clock in the system
tray. A right-click on it will show the interval settings.
Redundancy features in
Gcsystray
Independent from
the chosen synchronization interval, every hour there will be a check of both
the database as the personal calendar to make sure that all appointments
planned for the next 30 days are in the database. This check makes sure that
even when something went wrong in Outlook® and the real-time monitoring
failed, the appointments are still being recorded in the GroupCalendar™
.
Fast
mode
The box 'enable
fast mode' should be on by default. The purpose of this is that if a certain
appointment can't be located in the Outlook® folder at synchronization it
continues to search for it in a number of different ways. Normally this should
not be disabled but some Outlook® versions without service packs will find
that the synchronization works better without it.
Refresh GroupCalendar
A normal synchronization
will only create or edit the appointments in the Outlook® group calendar folder
that changed since the last synchronization. The refresh option will clean out
everything and recreate it again. This can be useful for appointments that are
corrupted and no longer respond normally. Again a feature that is used only in
case of problems.
(re) Export my
calendar...
This button will
create a record in the database for every appointment scheduled in the future
and share the information with the other users of the same database. This is a
nice feature to quickly restore a central database in case it is broken or
deleted by someone. in such a case a clean database would be placed on the
network and pressing the button will fill it with all future appointment and
as such recreate the group schedule again.
Select date
range or synchronize all appointments
This checkbox
changes the behavior of the synchronize button. Without ticking this checkbox
the synchronize button will check all appointments in the GroupCalendar™
database and modify or add the items that have been edited in the database
after the last synchronization. The checkbox gives the user the option to
select only a specific date range for synchronization. Only the selected range
will be filled with appointments and everything outside the selected range
will be removed from the view.
Tips
- De progress
counter adds up to 100% when synchronizing but it may need some extra time to
finish processing and close the synchronization form.
- De synchronization will not check if a user made a change to an appointment in
the group calendar folder without pressing the Edit button first. Changes by a
user to appointments in the group calendar without clicking Edit first will
not result in changes that are visible to other users! The incorrectly changed
appointment will only be corrected after pressing the refresh option.
Creating
appointments in the personal calendar for others to see.
No special actions
are required to share/show appointments with/to others. An appointment
that has been created in the personal calendar will be visible to others
automatically with the full name of the user in-between brackets or (when set)
the short name.
Creating
private appointments that show as busy without details to others
When an existing
appointment is being clicked with the right mouse button, the option to make
it private is being presented. This will hide all details of the appointment
from other users. Other users can only see that the user is busy but not why.
Creating a hidden
appointment
To hide an
appointment from others it must contain a special string in the text field. When
the string @@@ is added to an existing appointment it will get removed from the GroupCalendar™
database.
To be able to create
an appointment for another user, the other user must have GroupCalendar™
installed as well so the other users' username is known in the system.
Select the GroupCalendar™ folder in Outlook® and create a new appointment by:
- Selecting a time range in the Group Calendar folder, entering the subject and
pressing Enter. Or,
- By clicking the New button in the upper left corner and entering the details
of the appointment and clicking Save&close.
Now GroupCalendar™ will ask the following question:
Answering No to this question will create it in the Personal calendar.
Answering Yes to this question will display a list with users currently
using GroupCalendar:
Now one or more user
can be selected to receive the appointment in their personal calendars.
Clicking ok will
show the appointment in the GroupCalendar folder with the name of the creator in-between
brackets and the name of the designated user in-between vertical lines.
The above
appointment was created by Joe for Lars.
After
synchronization by the designated user (Lars), the ownership will change and
the other user will be owner of the appointment. It will also show in the
personal calendar.
From that moment on, the other user's name will show in-between
brackets.
The name and
creation date & time will be logged in the appointment that a delegate
creates or edits for another user.
TIP You can create an appointment for another user (in the Group Calendar
folder) and add @@@ to the body of the appointment. When the other user
synchronizes the appointment will move into his personal calendar but will NOT
become visible in the Group Calendar.
Editing
appointment as a delegate
Before trying to
edit an appointment in the GroupCalendar folder in Outlook®, the 'Edit
'button must be pressed. Otherwise the change will go by unnoticed.
Clicking the Edit
button will bring up the Group Calendar folder in Outlook® and the button will
show another image and text.
And an instruction
appears
After pressing
the OK button the Edit button icon changes again to indicate that it is
recording the changes.
Now one or more
appointments in the Group Calendar can be changed. The moment the user selects
another button or folder the icon will change back to the Pencil icon again and
changes will no longer be accepted.
After saving the
edited appointment, the subject will change just like when a new appointment for
another user is made showing | for: ...| and the other user's name.
As long as the other user does not synchronize with the database, the
appointment can be edited again.
Deleting
appointments of other people
Deleting
appointments has not been enabled in the GroupCalendar™ software. The
workaround to this is to edit the subject and/or move it to a non standard
timeslot (midnight). let us know if
you really need the option to delete appointments of others and it will be added
to the software.
Trying to delete
an appointment will display the following notification:
After this message
the group calendar will be resynchronized and the appointment that was deleted
will be displayed again.
Adding general
appointments and events
When an
appointment is added to the personal calendar, it will display in the group
calendar as well. When an appointment is added to the group calendar it will
go from there into either the users personal calendar or into another users
calendar depending on the answer to the question "is this an appointment
for another user?". However both methods don't enable users to create
events (deadlines, meetings, festivities) in the group calendar that remain in
there without transferring (ownership) into any personal calendars. This can
only be accomplished by first creating a new 'user' in the database that will
be used for this kind of events. To create such a user, open the database on
the network, open table TB_Users and add a new record to it with a name like
"Everyone" or "All" or "Event" anything goes..
even "-". After this users can create events in the group calendar
and when asked if the appointment is for another user, select the newly create
name in the list of users. When outlook®
2002/2003 is being used one can also select a label color for that kind of
events to make them better recognizable.
TIP
to reduce clutter You can create an appointment for another user (in the Group Calendar
folder) and add @@@ to the body of the appointment. When the other user
synchronizes, the appointment will move into his personal calendar but will NOT
become visible in the Group Calendar.
This feature can be used if you want to reduce the clutter in the group
calendar when planning for meetings with several people. You would have to do the
following:
- Create an item
in the Group Calendar and add @@@ to the body of it
- Answer YES when asked if it is for another user
- Select all meeting attendees from the list
- Select the GENERAL user as well (who does not exists)
After
synchronization by everyone, you will have only the GENERAL user in the Group
Calendar but all attendees will have it in their personal calendar and get a
reminder from that.
As an alternative
to creating items in another users' calendar one can choose to invite the
other user using the standard outlook email functionality.
If you want to invite someone, you use the
'Attendee Availability' tab.
However for the invitation to come across over
the internet in the right format you must first create the people you want to
invite in your outlook contacts folder.
Make sure you right-click on the email address and select "Always send...
rich-text format"
Laptop users can
continue to use the GroupCalendar™ when disconnected from the shared
database on the company network.
The configuration
of a laptop is nothing different from a network connected pc.
GroupCalendar™ detects if a connection is available and if the shared
database can be reached. If not it will fall back to a local buffer, the
Backdrop.mdb database, on the local computers' hard disk.
Once the
connection is reestablished the local buffer is emptied into the central
database automatically.
Offline users will
notice that Outlook responds slower then usual. This can be improved by
ticking the checkbox under the INFO button to tell
GroupCalendar™ that it should not look for the central database but work
off-line instead.
How to create a filter that shows only appointments of
people from the same department.
Open the "edit user info" dialog
Select the users in the
database (use the green arrows) and fill in the Department field
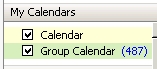
Select the Group Calendar folder
Outlook 2003
Outlook 2000 & XP
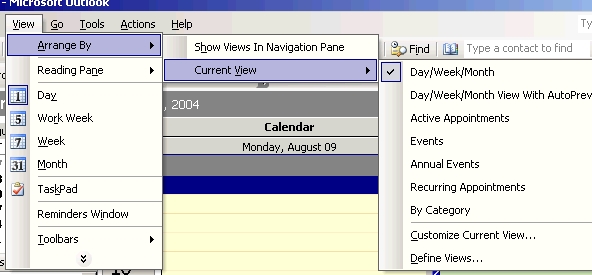
Select the "Define views" dialog.
In
Outlook 2000 and XP that's: View, Current View,Define Views.
In
Outlook 2003 that's: View, Arrange By, Current View, Define Views.
Click
"New"
Type
a name for your view. Start with a simple day/week/month view. Try the other
types later.
Click
the "Filter" button.
Click
the "Advanced" Tab
Click
on the Field
button and select the Departmnt field.
Type
the code (in this case – Sales) into the Value field and click
"Add to List"
Click
"OK" and "Apply View"
The view is now ready for use.
To switch quickly between the different
views, enable the advanced toolbar.
Enable the advanced toolbar through view (see opposite) or right click on the toolbar and click on advanced.
Switch
between views quickly from the drop down list on the 'Advanced Toolbar'
How to use GroupCalendar for resource
scheduling (conference rooms, cars, ...)
Before
GroupCalendar can be used for resource scheduling a unique code must be set for
the resource. Everyone who books
the resource must ensure that the same code is entered for each resource.
In this example we will create a filter for our projector. To recognize the projector
by a unique string we give it the name @P@.
The
@ sign is used as appointments are not usually made with this sign in the
subject.
So let's create the filter we need:
Step 1: Select the Group Calendar Folder.
Step 2: Select menu: View, Current View, Define
views
Step 3: Press the NEW button and type a
description for your view : Projector Booking and select "Day/Week/Month"
before pressing OK
Step 4: Press the Filter button and type
the unique code that is going to be used: "@P@" and press OK
That's all there is to it.
Don't forget to enable the Advanced toolbar
(View, Toolbars, Advanced) which gives a dropdown list of all your views and
filters. So every view is only one click away.

 Settings - select language - OK
 Answering No to this question will create it in the Personal calendar.
Answering Yes to this question will display a list with users currently
using GroupCalendar:
Answering No to this question will create it in the Personal calendar.
Answering Yes to this question will display a list with users currently
using GroupCalendar: